
This recipe is designed to be as easy as possible to follow, while making you look like a BBQ pro in front of your friends and family. The ribs taste great, but it’s the technique that is both super easy, but also looks like you totally know what you’re doing. Could there be a better recipe than that?
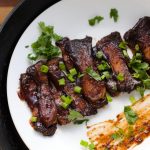
This simple recipe for baby back pork ribs can be made entirely in an oven, but are even better on an outdoor grill. The ribs are rubbed with spices before pre-cooking in the oven. Later, they are coated with BBQ sauce and then either broiled in the oven, or grilled to a beautiful dark mahogany.
Baby back ribs are ideal for this recipe because they are meaty and more tender than other rib cuts, which keeps the cooking time down. They’re also easier to cut, so you don’t blow your Pro BBQ image at the end by fumbling through the final cutting. They’re a little more expensive than the other cuts, but they’re worth it. If you cheap out and get something else, you’ll just need to pre-cook them in the oven for an extra 1/2 hour.
Shopping List
Here is what you need to get from the store:
- Baby back ribs – Plan on each rack feeding 2-3 people.
- BBQ rub – You should be able to find this in the supermarket. Otherwise there is a recipe below. The average sized container of this probably will cover 4 racks.
- BBQ sauce – You can definitely find this at the store. Count on one bottle per two racks of ribs. Any brand that looks Pro.
- Aluminum foil – The heavy duty stuff is easier to work with, but the regular stuff is ok.
- Baking sheet – The ribs will be wrapped in foil but you still need something under them in the oven.
Prepare the Ribs
Lay out a sheet of foil about twice as long as a rack of ribs. Place the ribs on the foil rib side down. Cover the meaty side with the bbq rub. Flip over and cover the bone side. Now wrap the ribs tightly with the foil keeping the meat side down. Your goal is to avoid any leaks. Now repeat with all the racks. The ribs should now sit at least an hour, but could go into the fridge for 48 hours.
Pre-Cook the Ribs
Preheat your oven to 300. Place the ribs on a baking sheet, keeping the ribs with the meaty side down. Bake for 1 hour. This will yield ribs that are tender but still a bit snappy. This is how the pros do it. If you insist on them falling off the bone, you can cook them for an extra 30 min. But, falling off the bone ribs are a sure sign of a rookie, so I would avoid that. If you used another cut of ribs, then add 30 min.
Now that the ribs are pre-cooked, you have a few options. They can be finished off under the broiler or on the grill immediately. They can sit for an hour or two. Or, they can be refrigerated for a couple days. This allows you to prep them ahead and finish them whenever you like. A pro would cook them before his guests arrive.
Finish the Ribs
When you’re ready to eat, fire up the broiler or grill. While that heats up, unwrap the ribs and carefully drain off the juices into container. (There’s a bonus use for that below for the true pros.)
Give the ribs a light shake of the BBQ rub again just on the meaty side. Place under the broiler or on the grill. Let them get a little color before coating with a light coating of bbq sauce. Turn them occasionally and continue coating with sauce. If grilling, keep the heat to medium or lower so they don’t burn. Give them at least 20 min on the grill. If they were refrigerated you’ll want to go at least 30 min to make sure they’re hot all the way through.
Serving like a Pro
A pro would now cut the ribs into two rib sections so it’s easier for guests to grab them. What kind of monster would only take one rib anyway, right?
Bonus Pro Sauce
To really look like a pro, you need a home made sauce, right? Wrong. You just need to look like you made a home made sauce. Here is how you do it.
Take the juices from pre-cooking the ribs and put them into a saucepan over medium heat. Simmer uncovered until they reduce to about 1/4 of the original volume. It should get quite a bit thicker but be careful that it doesn’t burn. Once it’s reduced, a bunch of bottled BBQ sauce into the saucepan and heat it until it simmers. Pro sauce is always a bit thinner than store bought sauce, so that’s what you’re going for.
Serve it in a bowl on the table. Use it to grill the ribs. Hide the bottles of sauce so no one knows you didn’t make it. When they ask if it’s home made, you can say “yes” because you did make it. Sort of.
BBQ Rub
Ingredients
- 1/2 cup brown sugar light or dark
- 2 tbsp kosher salt or 1/2 as much table salt
- 2 tbsp paprika
- 1 tbsp onion powder or granulated
- 1 tbsp garlic powder or granulated
- 1 tbsp black pepper ground
Instructions
- Mix and shake on ribs before cooking and after cooking. Put on the table to use as a seasoning.